How to Measure Torso for a Backpack
You know how unpleasant it may be if you’ve ever traveled with a bag that doesn’t fit your body. Nobody wants to spend their vacation feeling unpleasant as they trudge through obscure neighborhoods in search of their Airbnb.
You must learn how to measure your torso if you want to size a backpack correctly.
If you follow these instructions and ask someone for assistance, getting your measurement is simple.
You may find a step-by-step tutorial for how to Measure Torso for a Backpack below.
How to Measure Torso for a Backpack
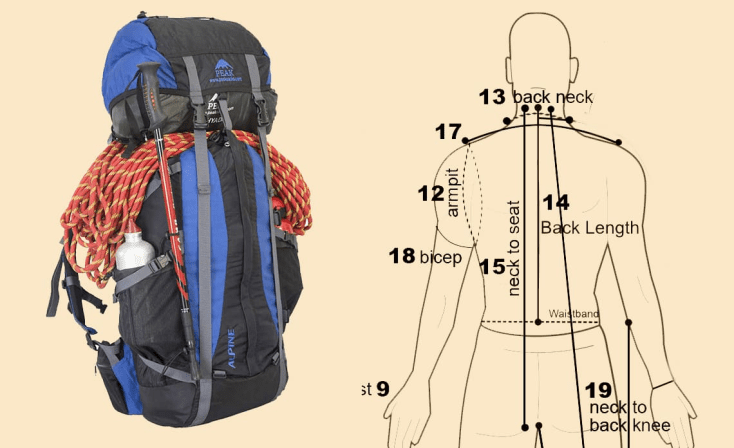
1. Measure Your Torso Length

You’ll need a pal and a flexible tape measure to precisely identify this important specification.
Lean forward and feel for the bony protrusion where your neck and shoulders meet. This is the top of your torso and the seventh cervical vertebra, sometimes known as C7.
Slide your hands down the ribs on either side of your torso to the iliac crest, which is the top of your hip bones.
Draw an imaginary line between your thumbs with your index fingers pointing forward and your thumbs pointing backward. The length of your torso is measured at this point on your lumbar spine.
Have a friend measure the distance between the C7 and the line you draw between your thumbs while you are standing upright. Your torso is that long.
2. Measure Your Hip Size

Even while it’s uncommon for a pack’s waist/hips sizing to be incorrect if the pack size is appropriate for your torso length, it’s still crucial to measure your hips.
The majority of your pack’s weight will be carried on your hips, thus a proper hip belt fit is essential.
Wrap the tape measure over the top of your hips, hugging the iliac crest you discovered while measuring the length of your torso.
The size of your belt and pant waist differ significantly since this line is a little higher than your beltline.
3. Adjusting Torso Length

Adjustable suspension, which can be found on many packs, enables a pack to fit a larger range of torso lengths and to better fit individual users. Although different brands employ various systems, most of them are pretty simple.
The first and most crucial fit modification you may make if you purchase a pack with this capability is torso length.
Recheck and reset the torso length if your other fit modifications don’t seem to be working properly. Adjustment straps are unable to make up for an improperly adjusted suspension system.
Also, Read Top 10 best backpack purses for travel (Perfect For Your Next Adventure!)
4. Fit Modification at Home
Multiple straps on your new backpack allow you to comfortably modify the load you’re carrying. The objective is to arrange your straps so that the majority of the burden rests on your hips because your legs have some of the strongest muscles in your body.
The four main adjustment straps are as follows:
- Hipbelt
- Shoulder straps
- Load-lifter straps
- Sternum strap
To simulate a load, begin by adding around 15 pounds of weight to the pack. Additionally, you’ll require a companion or a mirror to assist you in checking the fit after making each modification. Before you begin, loosen each adjustment strap a little.
Adjustments take place in two stages:
- The Main Event: shoulder straps/hip-belt
- The Finale: load-lifters/sternum strap
Additionally, because fit adjustment is a dynamic process, seasoned hikers constantly alter the tension in their straps to relieve pressure places (the encore).
Step 1: Hipbelt
Put on the knapsack. Adjust the belt so that the padding touches the iliac crest, the top of your hip bones. Adjust the shoulder straps to elevate or lower the hipbelt if it sits too low or high.
Secure and tighten the hipbelt buckle. The belt shouldn’t be too tight; it should be snug and secure without uncomfortable hip pinching.
If not, adjust your shoulder straps and hip-belt. Check that the padded portions of the hipbelt rest on the top of your hips. To find the ideal tension, experiment with different levels.
Your hipbones’ front point should be just a little above the belt padding. Additionally, the middle buckle needs to have at least an inch of room on either side: Call REI to see if a smaller belt is available if you have fewer.
Step 2: Shoulder straps
To tighten the shoulder straps, pull the ends down and back.
Although they should fit snugly over your shoulders, shoulder straps shouldn’t be supporting much weight. If they are, you’ll be overworking your upper back, neck, and shoulder muscles.
Verify that the anchor points for your pack’s shoulder straps are between 1 and 2 inches below the tops of your shoulders, or roughly at the tops of your shoulder blades. If not, either your hipbelt is too high or your pack’s torso length needs to be adjusted.
By tightening and loosening the straps, you can alter the shoulder strap tension. To relieve any pressure places or soreness during your journey, learn how to adjust the straps in tiny increments.
Step 3: load lifters
The top of the shoulder harness is connected to an anchor point close to the top of the back panel via load-lifter straps. When tensioned, they need to make a roughly 45-degree angle back toward the pack body.
Load lifters shouldn’t be overtightened! Even though it initially feels amazing, excessive stress might irritate the shoulder joints. Aim for tension that is snug, not stiff. Loosen the load lifters and try again if you find a space at the top of your shoulder harness.
Step 4: Sternum strap
A good place for the sternum strap to rest across your chest is about an inch below your collarbones.
To adjust the width of the shoulder straps so that your arms may move freely, buckle and tighten the sternum strap.
Avoid overtightening the sternum strap, which is a typical mistake. As a result, your harness may not fit well overall, your chest muscles may be constricted, and your respiration may be hampered.
Fit Adjustment on the Trail

Your nearly perfect fit could feel like a distant memory by mile 10. However, a good fit necessitates constant attention on the path.
When you first obtain your pack, experiment a lot with all of the straps to learn how things adjust.
Make sure you constantly remember what your ideal fit looks like at home so you can go back there quickly.
As you hike, adjust the straps to relieve pressure areas and aches. You’ll learn what works best for your pack and your body through trial and error.
The hipbelt can be loosened and the shoulder straps can be tightened as a popular load fatigue management technique.
Be mindful of your posture; if you lean slightly forward, the burden will seem more balanced.
When you take a break, remove your pack. This allows your back, which has been working hard, to take a break and breathe while you stretch out your tired muscles.
Bottom Line
You now know how to take your torso’s measurement. Then, using that figure, you can locate a backpack that is the appropriate size for you.
You may bring more with you on your vacation while still carrying your bag comfortably if you use the appropriate-sized travel backpack and adjust it for a great fit.